Showing posts with label 家有小厨. Show all posts

Thursday, November 29, 2012

生活点滴系列之——火锅!火锅!

冬日里,懒虫子如A和R总是对吃火锅的提议拍手叫好。感恩节前,火锅寿终正寝了,正在吃的开心的时候家里的那只老火锅挣扎着闪了两下灯,熄火了。没辙,吃了一半的火锅只好挪到了炉台前,对着真正的-火- 锅 - (火上的锅)勉强把一顿火锅烫完了。从此买新火锅就提上了议事日程,正式加入感恩节购物单。

昨日里,小R同学闲来无事翻看FB旧帖,看到去年火锅大餐的旧图,于是眼馋着提议晚上吃火锅!那么巧,新火锅很应景的也在昨天送到了,天气又冷,正是吃火锅的好时节,顺便测试新锅,还不用烧饭,于是懒虫子A和R又吃了顿火锅。

对新锅的报告如下:

优点:
  • 电磁炉、不锈钢锅、分体式设计,不烫手
  • 功率高、火锅升温速度快
  • 按键式多档调节、随时可以掌控温度
  • 还是咱国货,盒子上大大的几个中文:大同电磁炉
缺点:
  • 风扇噪音较大
  • 电缆长度较短
不过这也是Rui同学经过调研之后购买的性价比较好的火锅了。有兴趣自己在家涮火锅的同学可以考虑。感恩节我们买的时候50,现在好象变成$69.99了: Tatung TICK-1500W Induction Cook Top.

Monday, November 26, 2012

Sichuan Style Spicy Fish & Tofu (豆花鱼)

We love eating spicy food and Rui loves cooking spicy food.

A few weeks ago, we had an opportunity to try out a local restaurant Sichuan Garden in North Austin. It's a bit long drive but it's totally worthy. When we were in Round Rock for car shopping last weekend, we went there again. One dish we really liked is the Sichuan Style Spicy Fish and Tofu (Chinese name: 豆花鱼). So here is Rui's family edition.

Ingredients:

2 pieces of fish fillet (I used longley 龙利鱼)
1 box of silken tofu
3 -5 cloves of galic
1 tsp of grated ginger root
10 - 20 dried red chili (depending on how spicy you want the dish to be)
10 - 20 sichuan pepper (花椒)
1/2 cup oil
1.5 tbsp Roasted peanuts
2 tbsp spicy Sichuan soy bean paste (豆瓣酱)
1 tsp soy sauce
1/2 tsp sugar
1 - 2 leeks

Recipe: 
  1. Slice the fish fillet into 1 inch wide and 2-3 inches in length. Mix it with some corn starch (or 生粉/嫩肉粉, if you can buy them from Chinese supermarket), 1 egg white, 1 tbsp cooking wine, and a pinch of salt. Leave it aside for 15 minutes to 30 minutes.
  2. Cut tofu into small pieces (2 inches x 3 inches), microwave the tofu pieces in microwave for 2-3 minutes, drained. Put them in a container.
  3. grate ginger root, chop garlic, and chop leek to small pieces.
  4. Add 1/2 cup cooking oil in a cooking pot and heat it up. Put in Sichuan pepper, garlic, and ginger root you just prepared. When the fragrance comes out, put in soy bean paste and dried red chili. Cook for 1-2 minutes. 
  5. Pour in water (or chicken soup if you have some) and cook till it boils. Slowly add the marinated fish and cook till it's done. Pour the fish soup over the tofu pieces. To add some flavor to tofu, you can continue cooking the whole dish (with tofu) for a few more minutes.
  6. In a separate pan, roast some chopped peanuts. 
  7. Add the roasted peanuts and chopped leeks to the top of the dish.
Done! Now it's time to enjoy your Dish. : ) 


Thursday, June 21, 2012

Ghost Chili - Second Try

If you still remember, a few weeks ago, I posted our first-time experience trying a ghost chili. Alex and I were both surprised that the so-called "hottest chili in the world" was not hot at all. After telling my colleague about our experience, he also felt something's not right. So, the next day after our conversation, I found on my desk a bag of chilies - ghost chilies and Thai chilies. The ghost chilies were picked from the same ghost pepper plant which produced the non-spicy ghost chili we tried the first time.

I went home with the chilies and Alex made fried tofu again, with a ghost chili (seeds removed). Everything was the same as last time except this time the whole dish was spicy. I mean, not that spicy for me, but definitely spicy for Alex. He was drinking ice water the whole time when we were having dinner. 

Apparently, the ghost chili will become more spicy when you leave them on the vine a bit longer than normal, say, when they reach their full color.

And, no matter how many times Alex wants to challenge Rui on eating spicy foods he loses.  @_@

Monday, June 11, 2012

Homemade Zucchini Bread

I got two patty squashes from my colleague Patrick two weeks ago. Super cute squashes but I had no idea how to cook them so I just kept them in fridge for almost two weeks. Finally, I decided to use them to make some zucchini bread.

Before making my move, I had this short conversation with Alex 'cos we agreed to not do baking in summer. Who wants to bake in summer? :b It's simply too hot in Texas. 

Rui: I am gonna make some bread this weekend.
Alex: Go for it!
Rui: They will need to be baked for 40 - 60 minutes.
Alex: Oh, well. Our A/C will be running all night long....but go for it.
Rui: :-D

So, Saturday night after dinner I began to make my zucchini bread. The whole process was quite simple except for the grating zucchini part. Too bad I don't have a grater so I had to grate it using a blender (The blender does has this function but it simply doesn't work that well). The rest of the steps just simply included pouring this and that to the mixer and mixing them well.

After pouring the batter into prepared pans and let them bake for 50 minutes. My zucchini bread is ready for tasting. Really good and moist, and after all, not that sweet.

This is the recipe (Mom's Zucchini Bread on allrecipes.com) I used to make the zucchini bread.

Ingredients: 
  • 3 cups all-purpose flour
  • 1 tsp salt
  • 1 tsp baking soda
  • 1 tsp baking powder
  • 3 tsp ground cinnamon (I didn't have it so I didn't put cinnamon)
  • 3 eggs
  • 1 cup vegetable oil (I put 1 cup olive oil)
  • 2 1/4 cups white sugar (I reduced it to 1 cup sugar)
  • 3 tsp vanilla extract
  • 2 cups grated zucchini (more is ok)
  • 1 cup chopped walnuts or pecans
Direction: 
  1. Grease and flour two 8 x 4 inch pans. Preheat oven to 325 degrees F (165 degrees C). Well, I used two pans with different sizes 'cos I don't have two 8 x4 inch pans.
  2. Sift flour, salt, baking powder, baking soda, together in a bowl.
  3. Beat eggs, oil, vanilla, and sugar together in a large bowl and add them to the creamed mixture and beat well. Stir in zucchini and nuts until well combined.
  4. Pour batter into prepared pans and bake for 40 to 60 minutes (I baked 50 mins and let it sit in the oven for 10 mins) or until tester inserted in the center comes out clean.

      Btw, I love our Kitchen Aid stand mixer. :) We received it from my brother and sister-in-law as our wedding gift (Thank you guys!). I wasn't sure how I would use it but thought it would be nice to have it in the kitchen. It turned out to be a great kitchen appliance. No more hand mixing!


      Monday, June 4, 2012

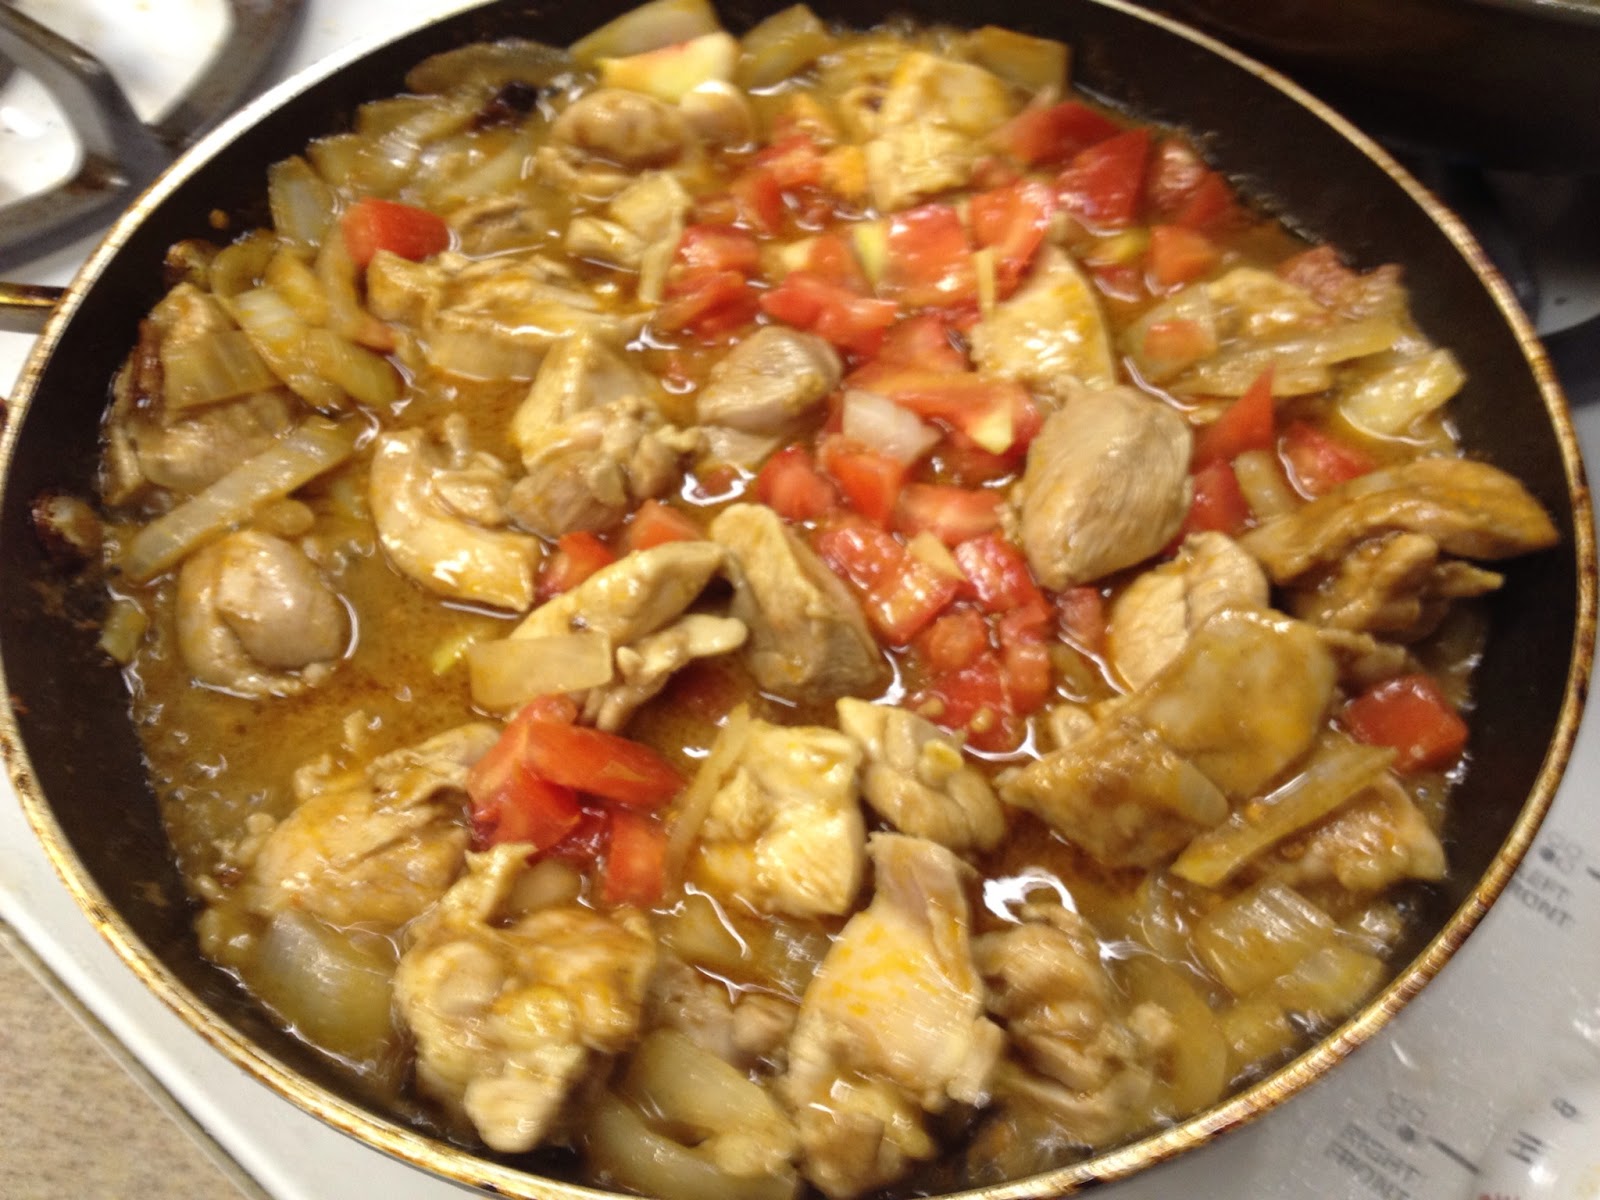
      Indian Chicken Curry

      Last month Alex and I tried an Indian restaurant "The Clay Pit" in downtown Austin. The food was really good in my opinion. We ordered Coriander Calamari as our appetizer and Lamb Roganjosh and Seafood in Garlic & Red Wine as the main entries. The fried calamari might not be the best we ever tried but both main entries were delicious. So was the naan.

      After that dinner I began to look for recipes for home-made naans and Alex decided to try making Indian  Chicken Curry. Till today, I haven't made any naans yet (blush~) but Alex did make some delicious Indian Chicken Curry last week. It's actually very easy to make and you can surely try it in your kitchen.

      Here is the recipe.

      Ingredients: 

      1 lb deboned chicken meat cut into bite-sized pieces
      1 large onion,finely chopped
      1 tomato, finely chopped
      olive oil
      water
      1 package Indian Vindaloo curry spice paste (yeah.we cheated a little bit by using curry spice paste but that's why I say it's very easy)

      Steps:

      1. Add onion and spice paste in heated oil and let them stir fry for 2 minutes.
      2. Add meat and stir fry for 3 more minutes.
      3. Add chopped tomatoes and some water and let it boil.
      4. Reduce the heat, cover the pan with the lid, and let everything cook for about 15 minutes.

      Done! :) You can either serve it with rice or naans. Since I haven't made the naans we could only eat it with rice. D-E-L-I-C-I-O-U-S!


      Tuesday, May 29, 2012

      鬼辣椒(Ghost Chili)初体验

      BhutJolokia01 Asit.jpg

      故事由一颗鬼辣椒(Ghost Chili 开始......

      我在上班的地方得到了一颗鬼辣椒,话说我们这里爱好种菜的同事很多,没事大家就会把家里种的各种蔬菜带来单位分发给大家,于是有一天我去休息室的时候就发 现桌子上放着几个标着各种辣椒的塑料袋,其中赫赫然就有大名鼎鼎的鬼辣椒,旁边标注(Ghost Chili (hot, hot, hot!!))。

      我对尝试鬼辣椒一直兴趣颇高,在Food Channel上看过好些关于鬼辣椒的秀,又听说这是所谓世界上最辣的辣椒,让我更有兴趣试试自己的胆量。于是,我拿了一颗,在Alex的远程指导下,用纸包了两圈带回家(据Alex同学说此辣椒沾哪哪辣,所以严加防护。)

      Alex同学很兴奋,当然Rui同学也差不离。怎么吃呢?仔细思考的结果是一椒三吃(实在是怕太辣,要每次吃一点减少辣度):一个鬼辣椒溜豆腐、一个酸菜鱼、再来一个...还没想好的某菜。
      豆腐大师Alex首先上场,先带上手套进行辣椒解剖。介于鬼辣椒的辣名远扬,我们一致同意将辣椒籽直接清理扔掉,只吃辣椒的无籽部分。一颗小辣椒被切 成了三块,在溜豆腐中放入了几片辣椒丝。炒好上桌,大家都怕会齐辣无比,又互相推诿了一番,最后由Alex同学小尝一勺,结论:毫无辣味。Rui同学不 信,也品尝一勺,结论:还是毫无辣味。两个人面面相觑...等一盘子溜豆腐吃完,压根还是毫无辣味。结论:或许我们把辣椒籽扔错了,难不成这鬼辣椒其实是 籽特别辣,其他部位不辣?后来我们又尝试用剩下的鬼辣椒炒了其他菜,结果仍然是丝毫不辣。

      至今,关于鬼辣椒为什么不辣仍然是个谜团。可能的答案两个:1)或许我们不应该把籽扔掉;2)或许绿的鬼辣椒还没成熟,要待到红了才辣。无论如何,答案是找不到了,等着下次尝鬼辣椒的机会吧。

      以此记AlexRui的鬼辣椒初体验。

      Monday, May 21, 2012

      麻辣鸡丝

      我小时候印象最最深刻的一道川菜就是麻辣鸡丝了,但凡家里吃新鲜的整鸡都会有三道必做的菜:炒鸡杂、清鸡汤、麻辣鸡丝。一鸡三吃而口味各有不同,实在是让人回味。也因此,在看到冰箱里的冷冻鸡腿的时候,第一个跳到我脑海里的念头就是做一道麻辣鸡丝,乘着老曾大厨(老爸)来访之际,咱也可以做道地道川菜,丰富一下Alex同学对川菜饮食文化的认识。

      麻辣鸡丝,简单易做,口感清爽,菜谱如下:

      1. 将鸡腿(或鸡胸肉)放入锅中去血水。
      2. 在重新倒入清水的锅中放入八角、姜片、桂皮、花椒和鸡腿(或鸡胸肉)煮约20分钟至肉熟。
      3. 将鸡肉捞起放凉,手撕鸡肉成鸡丝,放入碗盘中。
      4. 另起一炒锅,放入花椒干炒至炒香,倒入小盅捣碎盛起。
      5. 再在炒锅中放入切碎的干辣椒炒香,倒入小盅捣碎盛起。
      6. 在鸡丝中倒入花椒末、干辣椒末、加入少许盐、生抽、糖、香油,搅拌均匀即可上桌。

      Alex同学连吃三碗饭以示对老曾大厨所做麻辣鸡丝的支持,并于之后联想丰富的实践了麻辣鸭丝,对此菜的喜爱可见一斑。:)

      Thursday, May 10, 2012

      酸菜鱼

      Houston自从去年开了一家小熊川菜之后,对其进行讨论的帖子甚多,于是我也心心念念的要去尝尝。味道确实不错,所以自从尝了一次之后,我又连着去了好几次,不过尝多了之后就慢慢的发现问题了。首先,菜的口感确实不错,但量实在是少的可怜;其次,点鸭子给了一堆鸭骨头鸭脖子,点鱼汤给了一些鱼头鱼骨头。所以吃了几次之后大家的结论是:以后不能去了。

      “不就是酸菜鱼么,我会做。”偶在Alex面前很有信心的拍着胸脯宣称。他则以一副半信半疑的表情回应,然后一叠连声说:“是,是,肯定会。”虽然说了是了,可是很不诚服的模样。于是,就有了一锅香飘四溢的酸菜鱼出台。哈哈哈,我得意的大笑三声。Alex同学自从尝过“酸鱼汤”(他的叫法)之后,从此对Rui大厨表示心服口服。

      上菜谱:

      原料:龙利鱼片 2片; 酸菜 1包;中豆腐 1块;白菜叶 一些;粉丝 2捆; 姜、葱、蒜末 一些;泡椒 两勺;油少许


      做法:
      1. 将龙利鱼片洗净,切片,放入少许盐、淀粉、酒腌制10分钟
      2. 将酸菜(不要冲洗)切丝,酸菜汤放入一个小碗中保留
      3. 在热油锅中放入姜末、蒜末炒香,加入酸菜翻炒几分钟
      4. 在锅中加入足量的水,倒入保留的酸菜汤,放入切块的豆腐和切片的白菜,关锅盖大火煮开
      5. 锅中滑入鱼片,放入少许盐
      6. 另起一锅放入油和两勺泡椒炒香
      7. 在酸菜鱼锅中放入粉丝稍煮,然后倒入泡椒和油
      8. 在汤里撒上葱末即大功告成。


      虽有杂烩之嫌疑,可是口感甚好,得众人称赞。:)这一众人包括老爸、老妈、ALEX。lol


      Wednesday, June 8, 2011

      晚餐

      大厨Alex在看了我的blog后抗议说难道我做的海参还没资格上你的blog啊。事实是要写的东西太多,所以还没来得及提及。今天就来展示一下偶们的晚餐,由Alex, Jing和Rui共同完成。

      首先自然要推出Alex大厨完成的——蚝油香菇海参

      原料:蚝油、香菇、新鲜海参、青江菜苗、姜、葱

      做法(根据Rui的记忆,如有出错,大厨Alex补充说明):

      1. 将新鲜海参洗净切成小段,姜切片,葱切段,香菇切成小块

      2. 将海参在开水中略微烫熟备用;将青江菜苗放入少许盐的沸水略微烫熟捞出摆盘围边。

      3. 在炒锅中加油烧热,将葱、姜倒入锅中爆香,加入海参块、香菇及蚝油翻炒转小火焖煮稍许。

      4. 淋入太白粉水勾芡,翻炒稍许即可装盘。


      其次要推出Jing大厨做的川湘菜——肉末豇豆丁

      原料:肉末、豇豆、干辣椒、盐、酱油

      做法:

      1. 在肉末里加入少许老抽、生粉、盐、酒搅拌均匀

      2. 在锅中将油烧热倒入肉末翻炒至肉末散开,

      3. 大火在热油锅中将豇豆丁煸炒至豇豆丁变软,中间加入少许水,加入干辣椒、少许盐和酱油。

      4. 豇豆炒软之后将肉末倒入,煸炒稍许即可。


      最后推出的是Rui小厨做的几道家常蔬菜:香肠豆干蒜苔虾仁花菜青椒褐菇(portobello mushroom),实在太容易做,所以大家就直接看图说话吧。:)

      上一张众菜的全家福作为结束。:)Happy eating!

      Thursday, May 26, 2011

      辣煮小龙虾(crawfish)

      母亲节的那周周日本来是应该出门的,整个周末都在吃吃喝喝中渡过,实在是应该周日出门锻炼一下。周六中午去独一处吃早餐。(没错,不是烤鸭,是早餐。我去那里吃过一次之后就喜欢那里的早点了,又便宜又好吃,夫妻肺片尤其赞,Alex则很爱那里的京东肉饼,当然还有炒肝,那是被他称为“老北京”都爱吃的东西。)晚上和Alex的爸爸妈妈一起在一家土耳其餐馆大吃了一顿各类烤肉,回到家的时候已经做好了第二日出门的打算了,结果就看到室友买的小龙虾。看到的时候,室友已经将小龙虾清洗干净了,很细心的去了头和虾线,说是要做湖南香辣小龙虾。忒好吃啊,香辣入味,搞得我们尝完之后就改变计划,变成周日一早去买小龙虾做小龙虾boil——辣煮小龙虾。

      一早爬起来就冲去超市买了4.8磅大的小龙虾,5磅小的小龙虾加原料若干。来说说原料吧,美式做法。整个过程由Alex主厨,credit是要给他的。:)

      原料:清洗干净的小龙虾;香叶几片;青柠檬1个;cayenne pepper;一袋Zatarin's crawfish crab and shrimp boil调料;红皮土豆若干;玉米段若干;Andouille香肠一根

      制作:

      1. 洗小龙虾得费些功夫,主要是将小龙虾浸泡在清水中让它吐泥,重复5-6次至水清为止,再用牙刷将小龙虾刷干净。

      2. 将上述的原料(香叶,青柠檬块,半袋调料,cayenne pepper,玉米段,香肠段)放入大锅中煮至水开,倒入小龙虾煮开即可。


      Tuesday, May 17, 2011

      粑粑肉

      我小的时候老爸老妈很喜欢研究美食做法,那时候香肠自家灌,做风干的腊肉,没烤箱还会做蛋糕。等我长大了之后,老爸老妈的下厨热情就顿减,咱也就只能吃吃家常小炒了,不过偶尔的回想起来,我也还是对某几道菜印象特别深刻,粑粑肉就是其中的一个。

      之所以真的做了,是因为有天和Alex谈起小时候吃过的四川美食,然后就突然兴致所至的去google了粑粑肉的做法。咱生在新中国,长在红旗下,自然各种中国美食吃个遍,Alex小朋友就没听说过这个粑粑肉了,所以做来给他尝尝,顺便咱也回味一下童年印象。

      原料:

      • 绞猪肉 2磅

      • 姜末

      • 红薯淀粉

      • 鸡蛋


      • 料酒

      • 白菜


      做法:

      1. 将绞猪肉继续剁成细馅,放入一杯左右的淀粉,2个鸡蛋清,适量姜末,一些黄酒,盐,然后将猪肉馅搅拌均匀。偶是戴了个手套用手进去抓匀的,你也可以用筷子或者勺子搅拌。

      2. 在蒸屉里铺好白菜叶,将一半的肉馅倒在白菜叶上,轻轻拍平,将鸡蛋黄涂抹在肉馅表面,大火蒸20分钟。

      3. 蒸好的肉馅出锅放至冷却,切成薄片即可。


      后面的做法就可以因人而异了,按网上的做法在食用时取一个汤盆,在底部放上黄花菜,木耳,芋头,菜头等等,将粑粑肉薄片转圈码在垫菜上,加入高汤没过肉片,大火蒸熟即好。

      我们的做法则是著的粑粑肉汤,汤锅里放入白菜,木耳,黄花,将粑粑肉片放在其上,加入适量鸡汤和水,少量盐,汤煮好即可实用,一样的味美可口。

      有兴趣你就试一下吧。露个丑丑的笑,偶煎的荷包蛋。

      Monday, May 16, 2011

      椰丝纸杯蛋糕(Cupcake)

      用的是MITBBS里小觅的美食日记的椰丝小戚风方子,不过很有趣的是同样的材料,小觅说可以做36个中号纸杯蛋糕,偶就做出了24个。当然我没放那么多糖,所以蛋糕不是很甜,但感觉奶香口味更突出,所以怕胖的xdjm们,就跟着我的方子少放糖吧。:)

      材料:

      • 8个鸡蛋

      • 1 cup 糖

      • 1.5 cup 低筋面粉

      • 2 tsp baking powder

      • 1/2 cup 牛奶

      • 1/2 cup vegetable oil

      • 1 tsp 柠檬汁

      • 香草精几滴

      • 椰丝

      • 纸杯

      • cupcake烤盘


      做法:

      1. 将1/2 cup的糖和8个蛋黄搅匀,加入牛奶和油继续搅匀,然后过筛加入1.5 cup的低筋面粉和2 tsp的baking powder,轻轻搅匀。

      2. 在擦干净的容器中将8个鸡蛋的蛋白加入1/2 cup的糖用打蛋器打发,加入几滴香草精和柠檬汁搅匀。

      3. 将1/3的蛋白糊倒入蛋黄糊,用橡皮刀搅匀,再将其与2/3的蛋白糊混合搅匀。

      4. 将蛋糕糊盛入放了小纸杯的烤盘中至7分满,均匀的在表面撒上椰丝,迅速放入预热325F的烤箱中烤制25分钟。


      然后就是24个新鲜出炉的椰丝纸杯小蛋糕。

      烤前


      烤后

      Tuesday, May 3, 2011

      提拉米苏(Tiramisu)

      提拉米苏,有些咖啡的香醇,乳酪的酬香,手指饼干的绵密,可可粉的干爽,来自意大利的风情,我最爱的甜点之一。周末的时候尝试了这个甜点,用的是文学城上Lucy的recipe,真的很简单,但又很好吃,分享给大家。:)

      原料:
      Mascarpone Cheese (8 oz) 一盒
      鸡蛋黄 3个
      白糖 1/3 cup
      Heavy whipping cream 1 cup
      浓咖啡 1/2 cup
      Kahlua coffee liqueur(咖啡酒)2 tbsp
      Lady Fingers (手指饼干) 一包
      Cocoa Powder (可可粉)

      做法:
      1. 将 2 tbsp的咖啡酒和1/2 cup的浓咖啡混匀备用。
      2. 在干净的容器内将冰箱里直接取出(4度左右)的1 cup whipping cream打发,放入冰箱备用。Note: a. 容器和器具都完全不能有水;b. whipping cream打发即可,打的时间长了会油水分离。
      3. 将1/3 cup的白糖和3个鸡蛋黄混匀。烧开一锅水,将置有蛋液的容器在微开的水里隔水加热,不停搅拌至蛋液成细腻的糊状。
      4. 在搅拌好的蛋液中加入一盒(8 oz)的Mascarpone Cheese,搅拌均匀。
      5. 将搅拌好的奶酪蛋液糊加入打发好的whipping cream,轻轻搅拌均匀。Note: 不能使劲搅拌。
      6. 装盘:
      1) 将手指饼干在步骤1的咖啡+咖啡酒液中打个滚,然后依次摆放在容器底部。
      2) 在摆放好的一层手指饼干上倒上一层步骤5调配好的蛋液糊
      3) 重复1)和2)再摆放一层手指饼干,之上倒入一层蛋液糊
      4) 将容器用保鲜膜封好,放入冰箱(4度)冷藏一晚上
      7. 将冷藏一晚的容器拿出,在蛋糕表面筛上一层可可粉。

      大功告成,香甜美味的提拉米苏出台。

      提拉米苏

      请原谅卖相不是那么好,哈哈,毕竟是初次制作,先保证口感,再保证形象。至于口感么,绝对yummy,没吹牛的嫌疑。:)

      P.S. 买原料真是一件艰苦活,跑了Randalls,买到了cheese和whipping cream,手指饼干好不容易在Kroger找到,连买2袋。至于coffer liqueur去了Spec's买。就光买原料就逛了3个不同的地方才买到,汗~

      Saturday, August 29, 2009

      虎皮草莓蛋糕卷

      周末做了草莓蛋糕卷,是文学城私房小菜上的菜谱,不过我没有那么多原料,所以我做的算是简单版吧。

      材料:牛奶、糖、油、面粉、baking powder、4个鸡蛋、whipped topping

      蛋黄糊做法:

      1. 将50G牛奶和40G糖混合搅匀,加入40G植物油搅拌至混合。
      2. 在其中加入60G面粉(all-purpose)、1tsp baking powder拌匀。
      3. 加入4个蛋黄,拌匀。

      蛋白糊做法:

      将4个鸡蛋蛋白、40G糖用打蛋器打至能凝住的泡沫状

      蛋糕卷做法:

      在蛋白糊和蛋黄糊准备好之后,将1/3的蛋白糊倒入蛋黄糊搅拌均匀,再倒回蛋白糊搅拌均匀。准备的同时将烤箱预热到350F,将搅拌好的蛋糕糊倒入垫有parchment paper的烤盘中,放入烤箱烤15分钟。

      烤箱出炉后,待蛋糕冷却5分钟。将蛋糕倒扣在干净的纸上,除去蛋糕底部的parchment paper,选择较任意一面作为蛋糕卷外表皮,将蛋糕卷起放置至冷却。

      food 003food 004

      将冷却后的蛋糕卷打开,抹上whipped topping或者whiping cream,再嵌入切片的草莓,重新卷起。最后,做好的蛋糕卷放入冰箱冷却半小时左右,即可享受。:)

      food 007   food 009

      至于为什么是虎皮呢,呵呵,因为我的烤盘烤出来就这个效果。

      Sunday, May 24, 2009

      柠檬蛋糕(Key Lime Cake)

      其实Donna的做法是用来做纸杯蛋糕(cup cake)的,当然因为她说了也可以用来做普通蛋糕,所以偶就偷懒做了个普通蛋糕。一样的做法,烤的时间不同而已。food 002

      Cake (蛋糕)部分:

      • 1 box lemon cake mix (一盒柠檬蛋糕粉)
      • 5 eggs (5个鸡蛋)
      • 1.5 cup orange juice (1杯半橙汁)
      • 1 small box lime jello (一小盒柠檬凝胶粉)

      Glaze (蛋糕表面釉涂层,让蛋糕表面看着光亮):- 用这个量做出来的柠檬糖水绝对超过你需要的用量,可酌情减少

      • 4 tablespoons confectioner’s sugar (4 T 精制糖)
      • 1/2 cup lime juice (半杯柠檬汁,绿色那种)

      Icing (蛋糕上面的糖霜,你随便买个生日蛋糕就知道是啥了,上面那些花色就是糖霜做的,当然偶偷懒没做,这个得学习了才能做的漂亮)

      • 1 stick butter (黄油)
      • 1 block cream cheese (奶油芝士)
      • 1 teaspoon vanilla (1 t 香草汁)
      • 2 lb bag confectioner’s sugar (2磅精制糖)

      如果你做的是普通蛋糕,烤箱预热350F,烤30分钟左右(切记,每家的烤箱不同,出炉前用一根小牙签插到蛋糕里看看是否烤熟);如果你做的是纸杯蛋糕,那同样的温度烤18-20分钟。Enjoy!


      西兰花沙拉(Broccoli Salad)

      本来几周前就该贴的recipe,呵呵,不过偷懒了一下。好吧,说说这个菜谱,很简单,很好吃,但卡路里可不低,仔细看看里面放的什么,你就知道了。我的同事Donna提供的菜谱,不过照这个做出来的沙拉量超大,绝对够一个人吃N顿,所以你要是一个人的话,酌情减量吧。

      成分: food 007

      • One bunch broccoli chopped (1把西兰花,切碎)
      • One small red onion chopped (1个洋葱,切碎)
      • Eight ounce shredded cheddar cheese (8盎司筛丝的Cheddar cheese)
      • One cup mayo (Huh… 一杯蛋黄酱)
      • 1/2 cup sugar (半杯糖)
      • 2 tablespoons white vinegar (2T 白醋)
      • 6 slices cooked bacon chopped (6个切碎的熟培根)

      Mix the mayo, sugar, and vinegar and toss with the broccoli, onion, and cheese. Top with the bacon just before serving (就是这个那个混合搅拌大杂烩,最后撒点切碎的培根)。

      不要和我讨论卡路里哦,适合偶尔为之,不属于健康沙拉之列。请原谅偶的沙拉做的难看,我实在没耐心切成微缩小丁,呵呵,所以有的颗粒看着比较大。


      Saturday, February 28, 2009

      小饼干(Cookie)

      我对小尤说,嗨,我找到一份cookie的recipe啊,不过没具体计量单位的,就是很笼统的说这个放点,那个放点。她说,得,你换个吧,这是大师级别,估计菜鸟级都得拿着量杯称(汗一下,如我),大师级都是信手拈来。偶于是很得意的对她说,是啊是啊,有道理。想当初,你问我炒大白菜该放几tps的佐料,还真是让了愣了几秒,我可都是信手拈来的(言下之意,偶是大师)。哈哈

      Anyway,我这个baking菜鸟还是找来了一个recipe,周末学做cookie。因为是自己吃,所以把recipe上的原料一律减半,成品:巨无霸cookie 6个;正常cookie 6个。

      先来张准备材料的全家福(重要的几个,减半后的recipe):food 001

      • 1/2 cup butter, softened
      • 1/2 cup brown sugar
      • 1/2 cup white sugar
      • 1 egg
      • 1 teaspoon vanilla extract
      • 1/2 cup all-purpose flour
      • 1/2 teaspoon baking soda
      • 1/2 teaspoon baking powder
      • 1 pinch salt
      • 1.5 cups rolled oats1/2 cup golden raisins
      • 1/2 cups chopped walnuts

      做法如下:

      1. Preheat oven to 350F. Grease cookie sheets (parchment paper)
      2. Beat butter, brown sugar, and white sugar until light and fluffy
      3. Add an egg and keep beating well then stir in vanilla
      4. Combine flour, baking soda, baking powder, and salt and gradually stir into creamed mixture
      5. Sir in oats, wheat germ, raisins, and walnuts.
      6. Drop cokies by heaping tablespoonfuls onto the prepared cookie sheets and flatten cookies slightly
      7. Bake for 12 to 15 minutes, allow them to cool on baking sheet for 5 minutes before removing to cool completely

      food 002     food 005

      巨无霸和正常型


      Friday, February 20, 2009

      香蕉布丁(Banana Pudding)

      我的同事——甜点大师Donna的recipe。我自从吃过伊做的香蕉布丁之后一直念念不忘,其实基本上她做的甜点我吃过N多之后,N多都念念不忘。依样画葫芦做过Whoopie pie,可吃而不可观,呵呵,没她做的那么漂亮。这次准备来尝试做香蕉布丁,据说很简单,:)看着好象也不是很难,等着看我的成果吧。food 004

      Banana Pudding Recipe

      · 1 box Nilla Wafers – use half

      · 3 bananas – cut into bite sized pieces

      · 1 small box instant Jello vanilla pudding mix

      · 1 cup milk

      · 1 small container Cool Whip

      · 1 can Eagle Brand Sweetened Condensed Milk – use half, refrigerate the rest

      Combine pudding mix, milk, Cool Whip, sweetened condensed milk in a bowl using an electronic mixer. Blend till emulsified.

      In a deep bowl layer in the following order: wafers, bananas, liquid. (see right)

      Continue to layer until everything is used.

      Sprinkle the top with crushed wafers, if desired.

      我的作品来了,原材料+成品。:)这个是真的容易做。

       food 007